USer Experience Solutions
Homepage Templates
Explore the Themes section by navigating to the Platform’s Themes tab. From there, you'll discover a variety of homepage templates crafted to enhance your website’s user experience and visual appeal.
Our Homepage Templates provide you with a range of flexible skeleton designs, offering the foundation for a stunning homepage layout. These templates come with pre-structured elements and layouts but allow you the creative freedom to insert your own branding and graphics to make it uniquely yours.

Document Scanning
The Zamok Document Scanning feature is an all-in-one solution that allows users to efficiently scan, process, and share documents directly from the kiosk system. This robust feature is designed to streamline workflows, making it easier to capture, organize, and distribute crucial information.
Customizable Document Workflow Settings
At the core of the Document Scanning feature is the Document Workflow Settings, accessible via the Zamok Dashboard. Here, users can fully customize their scanning process, ensuring the solution fits their organization’s specific needs.
Step-by-Step User Guidance
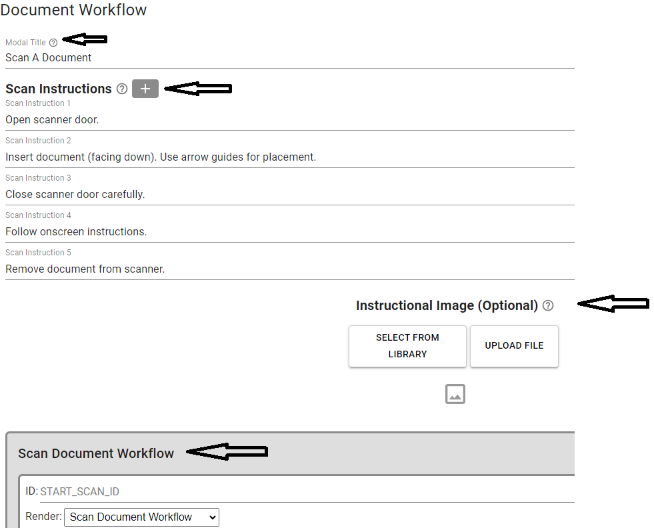
Users can start by setting the Modal Title, which will act as the headline displayed on the kiosk to guide them through the process. Clear Scan Instructions can be customized, helping users scan documents correctly with specific guidelines such as placement and orientation. You can even upload an instructional image to further enhance user understanding.
Tailored Scanning Workflows
The Scan Document Workflow allows users to personalize every aspect of the scanning process. Whether you need multi-step forms to gather additional information or the ability to adjust steps and questions, this feature is fully adaptable.
File Management and Distribution Options
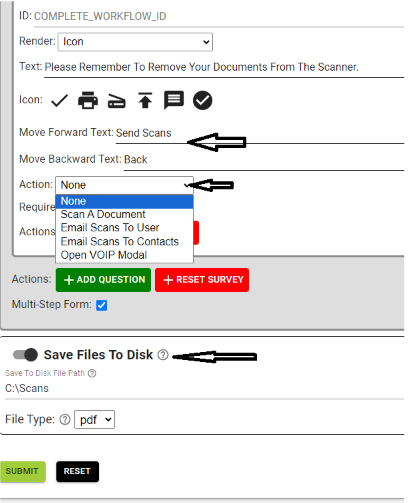
Once scanned, users can choose how they want their documents saved and distributed. Customize file formats for compatibility and trigger automated actions like Email Scans to User or Email Scans to Contacts, ensuring a smooth, hassle-free sharing process.
User-Friendly Navigation and Submission
The Document Scanning process is made easy with intuitive navigation buttons like Move Forward and Move Backward, allowing users to review their inputs. Once finished, the customizable Submit button finalizes the process and triggers the selected actions.
Real-Time Reporting and Insights
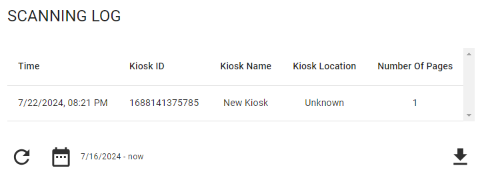
For administrators, the scanning feature integrates seamlessly with Zamok’s reporting and analytics. Detailed logs capture every aspect of the scanning process—number of scans, time stamps, and more—allowing for easy monitoring and optimization of document workflows.
Multi-Language Support
To cater to a global audience, the Document Scanning feature supports multiple languages. Users can select their preferred language for the scanning interface, making it easy for everyone to use the system, regardless of linguistic background.
A Powerful Solution for Document Management
Zamok’s Document Scanning feature offers a versatile and customizable approach to digitizing document workflows. By empowering users with detailed instructions, customizable workflows, and powerful distribution options, it enhances productivity and simplifies document management. Paired with real-time analytics and multi-language support, this feature is ideal for any organization looking to streamline its document scanning processes.
File Upload: Seamless Document Transfers to Web Portals
The File Upload feature in Zamok allows users to upload files directly from the kiosk to a designated webpage or web portal. This functionality is integrated with the existing document scanning workflow, making it easy to transfer scanned documents or other files to an online destination in a streamlined, efficient manner.
How the File Upload Feature Works
To enable the File Upload feature, a content script is added to the target webpage. This script identifies HTML file upload buttons and fields (tags with the type “file”) and redirects these interactions to initiate Zamok's document workflow.
The document workflow for file uploads mirrors the standard document scanning process but with key modifications to optimize it specifically for file uploading.
Customizing the File Upload Workflow
When setting up the document workflow for File Upload, irrelevant questions (like the “SEND_TO_CONTACTS” question used for email recipients) can be omitted to streamline the process. This ensures the workflow remains focused on the file upload task.
To offer users flexibility, the File Upload feature can use branching logic questions. For instance, users can choose between the standard scanning process and the file upload process through a multiple-choice question. Based on their selection, the workflow will automatically adjust, simplifying the user experience.
Enabling the File Upload Feature
Configuring the File Upload feature requires a simple setup in the Zamok Dashboard. Navigate to the Webview Workflows settings card and select the checkbox to enable the File Upload functionality. This activates the content script that links the file upload elements on the target webpage with the Zamok workflow.
Streamlined User Experience
Once enabled, users can initiate the file upload process at the kiosk. They simply navigate to the target webpage, select the file upload button, and Zamok’s system will automatically guide them through the workflow. With the adjusted workflow, unnecessary steps are skipped, ensuring users are only presented with the essential questions or instructions for uploading their file.
At the end of the workflow, the selected file is uploaded directly to the designated webpage or portal for immediate access by authorized personnel.
Simplifying Document Submission
With Zamok’s File Upload feature, organizations can optimize their document submission process, enabling users to upload files directly to web portals without needing manual transfers. This feature guarantees that uploaded files are immediately available for further processing within the target system, saving time and reducing friction in the workflow.
Guest Sign-In: Effortless Visitor Registration and Badge Printing
Zamok’s Guest Workflow feature simplifies visitor management by allowing users to input essential details, capture a photo, and print a visitor badge—all from a single kiosk. This intuitive solution streamlines the registration process, making it quick and easy for both guests and organizations.
Step-by-Step Registration Process
To begin the Guest Workflow, users simply click on a template button that launches the guest registration form. This modal window prompts visitors to enter basic information such as their name and company—both of which are mandatory and appear on the printed visitor badge. Additional questions can be added to the form to collect extra data, though this information won’t be printed on the badge. Instead, it will be sent to the Zamok dashboard for record-keeping and analysis.
Photo Capture for Added Security
A standout feature of the Guest Workflow is its ability to capture a photo of the guest using the kiosk’s built-in camera. After clicking the "Take Picture" button, a countdown timer ensures the guest is ready, and the photo is automatically cropped to focus on the guest’s face. If unsatisfied with the picture, users can easily retake it with the “Retake” button, allowing for multiple attempts to ensure a suitable image.
Printing the Visitor Badge
Once the guest's information and photo are captured, the kiosk prints a visitor badge. The badge includes the guest’s name, company, and photo. While the overall layout is fixed, there is some room for customization. Organizations can add a logo and a custom title, though the core design remains consistent for simplicity and readability.
Reporting and Analytics for Visitor Management
The Guest Workflow is more than just registration—it also provides valuable insights through detailed reports in the Zamok dashboard. Logs include data such as the date and time of guest registrations, the kiosk used, and responses to additional questions. These reports help organizations analyze visitor trends, identify peak registration times, and refine their guest management process.
Configuration Guide for Administrators
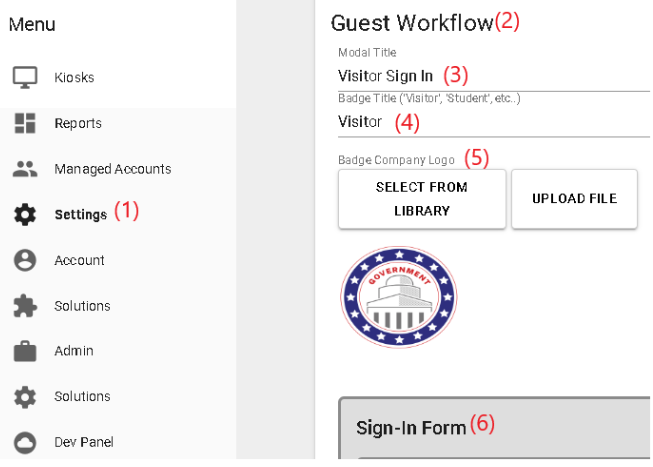
To set up and manage the Guest Workflow, administrators can access the Settings section in the Zamok dashboard. The following settings can be configured:
- Modal Title – The title shown during guest sign-in.
- Badge Title – The title printed on the visitor badge.
- Badge Company Logo – The logo included on the badge.
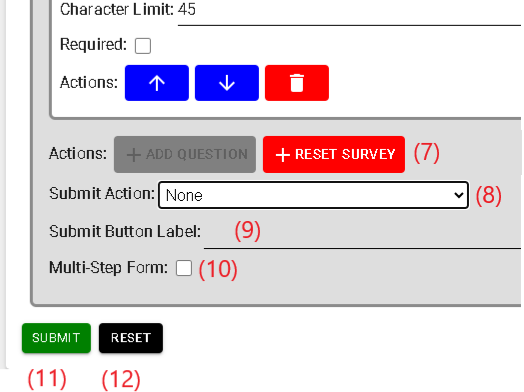
- Sign-In Form – The form fields visible during the registration process.
- Add Question / Reset Survey – Add or reset survey questions in the guest registration form.
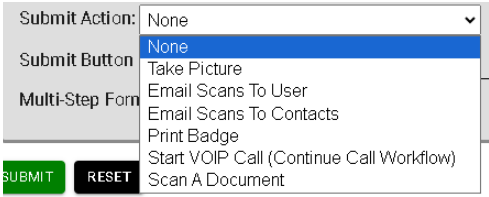
- Submit Action – Choose what happens after completing the form.
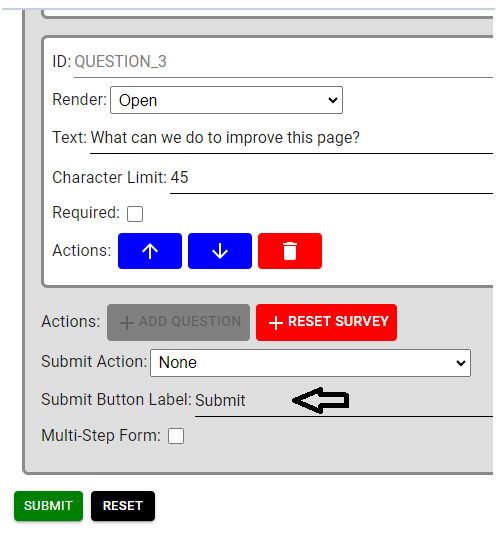
- Submit Button Label – Customize the text of the submit button.
- Multi-Step Form – Enable to add specific actions after each question.
Enhancing Security and Efficiency
Zamok’s Guest Sign-In feature is a practical and user-friendly solution for managing visitors. By capturing essential details, taking photos, and printing visitor badges, organizations can streamline their guest registration process while improving security. With customizable forms and integrated reporting, it’s easy to keep track of visitor data and optimize guest management workflows.
Acknowledgement Page: Confirming Guest Registration
The Acknowledgement Page in Zamok provides a clear and concise confirmation for users after they complete the Guest Workflow. This page ensures that visitors know their information has been successfully processed, offering peace of mind before they proceed with their visit.
Once the guest’s details are entered, the photo is captured, and the visitor badge is printed, the Acknowledgement Page serves as the final step. It displays a summary of the guest’s registration details and a confirmation message, reinforcing that the process is complete.
Key Features of the Acknowledgement Page
- Confirmation Message: The page provides a clear confirmation that the registration process is complete.
- Thank You Note: A customizable thank-you message can be displayed, offering a personal touch from the organization.
- Next Steps Guidance: If required, the Acknowledgement Page can include instructions on what to do next—such as where to collect their badge or directions to the waiting area.
- Visual Cues: The page can display the company’s branding, maintaining a professional and cohesive user experience throughout the workflow.
Customization Options
Administrators can customize the Acknowledgement Page to fit the needs of the organization:
- Custom Thank-You Message: Personalize the closing message for a more welcoming experience.
- Actionable Next Steps: Optionally include guidance, such as where guests should go after registration.
- Branding Elements: Add logos or custom colors to reflect the company’s identity, providing a consistent brand experience.
Enhance Your Visitor’s Experience
By including a clear Acknowledgement Page, organizations ensure that visitors feel confident and informed at the end of the registration process. This final step in the Guest Workflow wraps up the guest’s interaction with the kiosk smoothly and professionally, helping streamline the entire visitor experience.
Satisfaction Survey: Collecting Feedback for Continuous Improvement
The Satisfaction Survey feature in Zamok is an interactive and user-friendly tool designed to capture valuable feedback from kiosk users. This feature empowers organizations to gather insights about customer experiences and satisfaction with services, allowing them to make data-driven improvements.
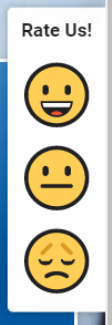
How It Works: Emoticon-Based Feedback
Users begin the survey by selecting one of three emoticons—positive, neutral, or negative—located on the right side of the kiosk screen. Clicking an emoticon triggers the survey process, where a modal window presents a series of questions.
Customizable Survey Questions
Administrators can configure the survey through the Satisfaction Survey settings card in the Zamok Dashboard. This includes:
- Custom Modal Title: Adjust the header to match your organization’s branding.
- Sidebar Text: Provide clear instructions or prompts to users before they start the survey.
- Question Types: Choose from text, multiple choice, ratings, or dropdown formats.
Up to three survey questions can be included, which can be mandatory or optional, offering flexibility in gathering specific feedback.
Easy Submission and Comprehensive Reporting
Once users complete the survey, they click a customizable submit button. Responses are securely stored and accessible through the Reports section of the dashboard, where administrators can view data such as submission time, kiosk location, and user answers.
Reports can be filtered by date and exported as CSV files for deeper analysis or integration with other systems.
Post-Survey Follow-Up
After submission, a customizable Thank You page appears. This page can include:
- A follow-up message, expressing gratitude for the feedback.
- A link to your company’s website, with a button leading to further engagement.
Administrator Guide
From the Kiosk Dashboard:
- Modal Title: Title of the survey modal.
- Sidebar Text: Instructions on the survey widget.
- Follow-Up Message: Additional message shown on the Thank You page.
- Company Website URL: Links users to your company’s website.
- Survey Form: Customizable survey questions.
- Submit Action: Define what happens after the survey submission.
- Multi-Step Form: Option to display a submit action for each question.

Improving User Experience Through Feedback
By leveraging the Satisfaction Survey feature, organizations can actively gather user insights and improve kiosk services. The emoticon-based feedback, flexible survey questions, and detailed reporting offer a comprehensive way to understand and enhance customer satisfaction.
Instructional Popup: Clear and Engaging User Guidance
The Instructional Popup feature in Zamok enhances the user experience by providing clear instructions, additional context, or important information before a specific workflow or action is taken. Displayed as a modal window overlaying the screen, this popup captures attention and ensures that users have the necessary guidance to proceed confidently.
How It Works
The Instructional Popup is triggered when users initiate certain workflows or click a designated button on the kiosk. Administrators can configure this feature via the Zamok Dashboard by selecting the button or element to activate the popup, then choosing the "Instructional Popup" option from the workflow settings.
Rich Text Editing for Customized Content
The popup’s content is highly customizable using the rich text editor within the Zamok Dashboard. Administrators can create visually appealing and informative instructions with formatted text, images, or videos. The WYSIWYG editor provides flexibility without the need for coding, ensuring ease of use.
Flexible Button Labels and User Interaction
Administrators can also define button labels to fit the action, such as "Next" to proceed or "Close" to dismiss the popup. This ensures that the popup matches the workflow context and provides a user-friendly experience.
Practical Applications
The Instructional Popup is ideal for guiding users through complex workflows, providing important disclaimers, or offering step-by-step instructions before initiating a task. By including visual aids like images or videos, the popup reduces confusion and enhances clarity.
Presence Detection
The Presence Detection feature in Zamok kiosks uses advanced sensors to detect when a user approaches the kiosk. This feature automatically adjusts the display or triggers specific actions—such as playing a welcome message, starting an interactive sequence, or highlighting key content—ensuring that the kiosk captures attention and engages users seamlessly.
How Presence Detection Works
Zamok’s Presence Detection technology activates when the kiosk senses someone entering its proximity. This can be done using motion sensors, infrared technology, or other sensor types depending on the kiosk's setup. Once presence is detected, the kiosk screen switches from an idle state to an active mode, displaying content designed to engage the approaching user.
Customizable User Engagement
Administrators can configure what happens when presence is detected. For example, the kiosk can:
- Play a welcome message.
- Display a promotional video or product demo.
- Trigger interactive menus or call-to-action buttons.
- Offer immediate assistance with directions or product information.
These actions are configured through the Zamok Dashboard, giving organizations flexibility in choosing the content or actions based on their specific goals.
Enhancing User Experience
By detecting when users approach, this feature creates a more interactive and responsive kiosk experience. It helps draw users in, encouraging them to engage with the kiosk without needing to touch or initiate anything manually. This is particularly useful in high-traffic areas like shopping malls, airports, or public service centers, where immediate user engagement can make a big difference.
Privacy and Sensitivity Control
Zamok’s Presence Detection does not store any personal data and only detects movement within a certain range. Administrators can adjust the sensitivity level in the settings to ensure the kiosk responds appropriately based on its environment. This helps prevent false triggers or overly frequent activations, improving both user experience and hardware performance.
Applications and Benefits
The Presence Detection feature is versatile and applicable across multiple environments:
- Retail: Automatically showcase new products or promotions when customers pass by.
- Public Services: Greet users with relevant information or instructions as they approach.
- Hospitality: Offer a personalized welcome or assistance when a guest walks up to a kiosk.
By making kiosks more responsive, this feature drives engagement, increases user interaction, and improves overall service efficiency.
Zamok’s Presence Detection enhances user engagement by ensuring that the kiosk responds dynamically to people as they approach. With customizable actions, adjustable sensitivity, and privacy safeguards, this feature adds value across a wide range of use cases, from retail to public services.
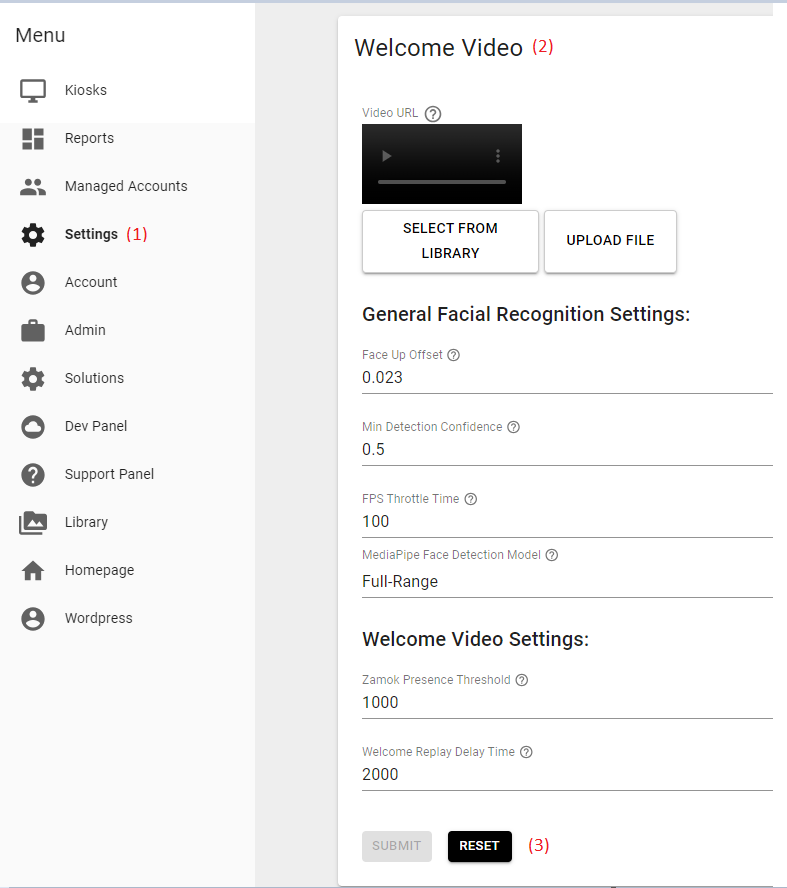
Welcome Video: Capturing Attention with Dynamic Visuals
The Welcome Video feature on Zamok kiosks allows you to play a customized video when users approach or engage with the kiosk. It’s an excellent way to provide a welcoming introduction, share important information, or display promotional content, enhancing the user’s experience from the moment they interact.
How to Configure the Welcome Video
Follow these steps to set up your Welcome Video:
- Access the Settings: From the Kiosk Dashboard, navigate to the left-hand pane and search for the Settings tab (1). Once inside, locate the Welcome Video section (2).
- Make Adjustments: Adjust the video settings as needed. Default values are provided, but you can customize them to suit your specific requirements.
- More Information: For additional details or explanations of each setting, hover over the "?" icon next to each option. This will provide further guidance on what each setting controls.
- Save Your Changes: After making the necessary adjustments, ensure you click Submit (3) to save all changes.
Maximize Engagement with Your Welcome Video
By properly configuring your Welcome Video, you can create an engaging, personalized experience that captures users’ attention right as they interact with the kiosk. Don’t forget to test your settings to ensure the video plays smoothly and aligns with your overall user experience goals.
FaceLock: Advanced Security for Seamless User Sessions
The FaceLock feature in Zamok kiosks is an innovative security tool that uses facial detection technology to protect and secure user sessions. By continuously monitoring the user's presence through the kiosk’s camera, FaceLock adds an extra layer of protection, ensuring privacy and security throughout the entire interaction.
How FaceLock Works
Administrators can easily activate FaceLock for specific workflows via the Zamok template editor. By toggling FaceLock in the configuration pane, it becomes seamlessly integrated into the selected workflow.
When a user starts a workflow with FaceLock enabled, they’ll be asked if they want to secure their session using this feature. Once activated, FaceLock will monitor the user’s face throughout their session. If the user steps out of the camera’s view, a warning modal will appear, giving them a brief countdown to return.
Real-Time Security Alerts
FaceLock instantly detects if the user leaves the camera’s range. When this happens, a warning modal with an audible alert appears, much like Zamok's session timer. The modal features a countdown clock and a message notifying the user that their session will end if they don’t return within the set time limit (default 10 seconds).
Customization and Flexibility
Administrators can fully customize FaceLock settings via the FaceLock settings card in the Zamok Dashboard. Options include adjusting the countdown timer duration, facial detection sensitivity, throttle times, and range models to suit different environments or security needs.
Continuous Session Monitoring
FaceLock remains active for the duration of the session and can only be deactivated when the user presses the Zamok browser logout button. This ensures that user sessions are consistently monitored and secure, right until the user intentionally logs out.
Considerations and Limitations
It’s important to note that FaceLock uses facial detection, not facial recognition, meaning it tracks faces without identifying individuals. This means that if multiple faces are detected, FaceLock may track them all, which could allow another person to maintain the session if they stay within the camera's view. Adequate lighting and clear camera placement are also crucial for optimal performance.
Enhancing Kiosk Security
FaceLock provides robust session security for kiosks, ensuring that users’ private information remains protected if they leave the screen. With customizable settings and real-time monitoring, FaceLock enhances both the user experience and the security of the kiosk system.
Other Articles related to FaceLock:
Discover Our Innovative Kiosk Solutions
Streamline your kiosk management with our advanced software solutions.